MODULE THREE: SHOOTING THE MASTER -- PART TWO
updated 2/1/04 and still in-progress
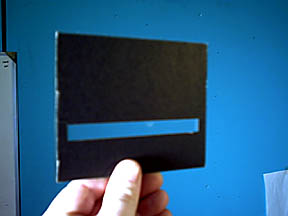
Here is a photo of one of the slit masks placed over a holographic plate. Notice how it allows the laser light to enter through the cut out slit, yet covers the remaining area of the plate.
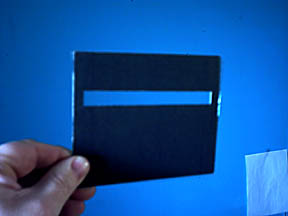
Another photo, this time showing a different slit mask placed over the holographic plate. Compare this to the previous photo above, and see how the slits reveal separate areas of the plate. In this case, the exposure that would have been made during the previous photo is now protected -- by now being covered. This exposure (above) was protected during the exposure shown in the first photo. And so on, and so forth, for all eight exposures/slits/masks.
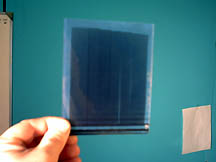
A photo of the completed laser transmission master will all slits exposed, side-by-side. When the left and right eyes looks through these slits, they see several perspectives at one time (from the different film frames exposed with each associated slit position). The brain then assembles this info into a three-dimensional image.
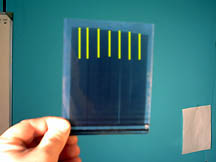
Yellow line overlays on the photo show the slit positions (approx.) relative to one another. Take note to the slight gap between slits 5 and 6 toward the bottom. This was due to a slip of the slit mask when placing the plate and mask into the plate holder during one of the exposures (either slit 5 moved down, or slit 6 moved up). Care should be taken to insure that all slits butt against one another -- with neither a gap, nor overlay between them. This resulting gap would create a "blank" area when viewing the white light reflection transfer. Overlays are less of a problem overall. With computerized slits, the slit edges could be made 50% transparent and overlaid -- hence creating a 100% exposure for the overlay area.
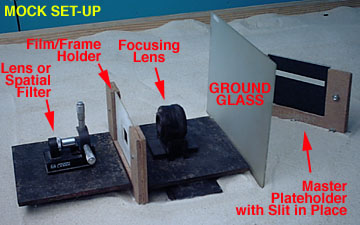
A mock-up to show the relative positions of the components used to project the film images onto the ground glass surface (similar to the workings of a slide projector). To see the actual orientation per the table layout, view the table illustration at the beginning of this module. I set this up just for ease of taking the photo. This is one area where you will have to determine placement of lenses for yourself, due to whatever focal length your lenses are. Also, note the 45-degree relationship between the ground glass and the master plate holder. This geometry is very important -- not only for the resulting and yet-to-come transfer geometry, but also to place any residual slit lines out of "line of sight" in the white light reflection hologram when matted, framed and viewed on a wall (the slit lines will be projected 8 inches out from the hologram and angled at a 45-degree angle. The viewer, naturally, is going to focus on the image in the plane of the hologram, in effect, looking "through" the now-blurred slit lines).
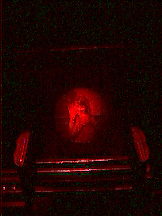
A finished laser transmission master being illuminated with laser light. Due to the monochrome nature of the laser light, along with its saturation, to this day they are still difficult for me to photograph with any sense of quality. I can assure you that this master is sharp, bright and exhibits great contrast, along with shadow and highlight detail. It is also incredibly three dimensional . . . just like a really nice holographic portrait . . . on a 4 x 5 inch plate.
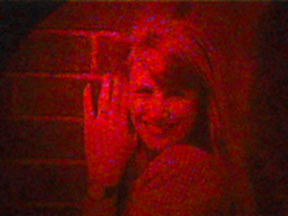
Switching over to the video camera -- which seems to do a bit of a better job than the digital still camera, but still leaves much to be desired -- I zoomed in close on the projected image of the laser lit master. Not the best example as a frame-grab, but viewing the master "in person", you can clearly see details such as the watch dial (just before noon), the texture of the brick and mortar, and of course, the detail of the model herself -- along with the sharp pattern on her blouse -- which is not showing up here at all. The dimensional quality is such that the "space" underneath the models hair at her neck/shoulders goes all the way back in depth. You can view these, and other masters and transfers, at the Meet & Greet in Philadelphia, October, 2004. With this particular piece, you'll see an SUV quickly pull in to a parking spot in the distance behind her as you move past the hologram.
Watch video of master image 550k
I took the video camera, zoomed in, and panned back and forth across the projected image of the laser lit master. If you look closely, you can just barely make out the slit lines moving across the image as the camera pans. If done properly and according the the previous table layout and measurements, when the H1 is transferred to the H2, the slits will locate themselves 8 inches in front of the reflection hologram. This, for all practical purposes and designed specifically for this technique, places the slits below the image and at a 45-degree angle downwards. This in effect, moves the slits out of the "line of sight" and also blurs out any hair-thin visible slit lines so that they cannot be seen by the viewer. This is in RealVideo format, using RealPlayer (same player as HoloTalk).
TO WRAP THIS SECTION:
I'm already assuming that you have had experience making laser transmission holograms. All that is needed now is to expose each of your slits with their corresponding frames, making sure that the image on the ground glass is ALWAYS in the same position -- regardless of the fact that the image moves across the frame area from shot to shot. You must hand-register each image so that they are all in alignment with one another. I do this on a light-table and I have two film holder cards. I place/tape the previous holder card on the table with the frame still in place. Then I place/tape the second film card on top of that. I then take the new film frame and align it to the film frame below it by hand. You will actually see the face come into alignment. Once it is aligned, I tape it in place onto the film card, then place the film card back into the film card holder on the table. The image on the ground glass should now be in the same position as the previous -- even though it was NOT in the same place in the actual frame (got it?). One trick I've always used is to place the point of a pen right at one of the nostrils on the ground glass before taking the film card out of the holder. When I place the new (and already aligned) film card back, I make sure that the same nostril projected on the ground glass is right on the pen point once again. If not, then I do a slight adjustment. I have also done this with the pupil of the persons eye for alignment. Whichever area you choose to use, always make sure to do it with whatever person, or object, is the main focus of the hologram. Using something in the distance will not insure that the person is registered each frame.
Once you're ready to go, it's just like making any other laser transmission hologram -- except that you'll be making eight exposures on one plate. Expose slit one with film frame one, slit two with film frame two, and so on and so forth, until all eight have been completed. Don't forget to allow for settling time between exposures -- and also don't forget to keep your master plate oriented properly if you are removing it and placing it into a light-tight box upon changing film frames. If this is not done, then the master plate has the danger of being placed back into the plate holder either upside down, or backwards, etc.
Complete all eight exposures, and process with your favorite processing technique for transmission holograms. Beams ratios should be the standard for mastering: from 4:1 to 8:1 (reference/object), depending on how much power you have to spare in order to keep exposure times down.
Once processed and dried, hold your finished hologram in the portrait position and bring a spread beam in to the plate. Looking down into the hologram and through the slit exposures, you will not only see the person, but see them three-dimensionally.
It is a very eerie experience to see one of these . . . especially when it is someone that you know. In the hologram, they are "there" in front of you again. If you now turn your head sideways and look down again, the image will go flat, losing all dimension -- due to the horizontal parallax and perspectives now being gone. Turn your head back, and the person pops back in to a three-dimensional image again. You will realize just what it is that you are now on to the minute you see your first one.
On another note . . . I have an LCD ordered and it is on its way. I'm hoping to work out full-color using a simple triethanolomine technique . . . with standard plates, and with a standard single-freq. laser . . . utilizing color separation tables in Adobe Photoshop (and resulting RGB greyscale images) to compensate for the hue errors that have long been associated with the use of TEA for obtaining an RGB holographic image. There will be a way to stablize that color once it's achieved, too . . . with no shifting hues due to swelling and shrinkage of the emulsion due to humidity changes. These activities will be recorded in the full color notebook section. But for now, the priority is filling out our initial section/techniques of "hand crafted" portraits.
Additional Possibilites Down the Road:
I have "stacked" holograms in the past. I believe that by registering and "stacking" RGB color-separated masters and Illuminating with a narrow bandwidth RBG LED array, full-color could also be achieved during viewing -- without the need for a reflection copy at all. Of course, these holograms would have to be constructed with "stand alone" LED array light sources -- but that's not out of the question. This would work best with bleached masters on thin substrate film (due to the transparent nature of bleached masters). There are certainly issues with this technique right out of the gate, such as recording in one wavelength and playing back in another (each wavelength gets refracted differently). This is where the registration of the three pieces of film would come in. Also, since the LED array would require three angles of illumination, pehaps all three exposures could be put onto one plate at those respective reference angles. This would negate the possibility of ever being able to put three separate pieces of film in register . . . but this is what experimentation is all about, right? This is for much further down the road.
Lots to do and more on all of these future items as things unfold.
The mastering process is the most difficult. Practice making great masters and great reflection copies will follow. I will continue to build out this mastering section in more detail as time allows.
NEXT MODULE: THE REFLECTION TRANSFER
BACK TO MAIN PORTRAIT PAGE
BACK TO HOLOWORLD

|
