| |
|
DIGITAL HOLOGRAM PORTRATIS #3 -- 2/18/04
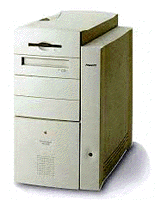
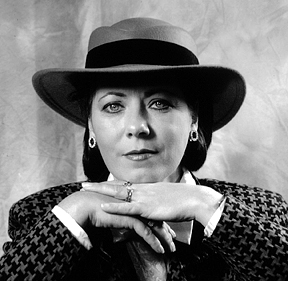
The workstation that will drive the Proxima Ovation 846 LCD panel arrived this week. In report #2 (previous report) I tested the 846 with a video feed through its component video input. For this initial workstation test, I used an already-produced standard test frame, and fed the 846 through its VGA monitor input directly from the VGA output of the workstation. The workstation is a Mac PowerPC 9650 Workgroup Server. This unit is several generations old by today's standards, but quite a workhorse in its day, and built like a tank. It has a 350MHz 604e PowerPC processor, along with 2 40GB Ultra-SCSI Seagate Barracuda RAID drives. Actually, quite a bit overkill for only flashing pictures on an LCD, but the best part is that I picked it up on Ebay for $99, and it is in beautiful condition. This model has quite a following -- almost cult-like -- especially with home multi-channel audio recording enthusiasts, and I was very fortunate to not only pick one up at this price, but find one in such pristine condition. Here is the reduced-size direct image that I used (this is my wife):
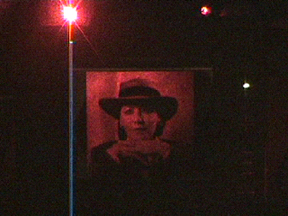
And below is a video frame-grab, shot in complete darkness of the full-frame (640 x 480) image fed from the workstation to the LCD panel.
Although it truly is hard to tell via the image quality above, when viewing in person I would have to say that the LCD showed much better results than the video test frame (previous report), and I believe this is due (partially at least) to the shot above being in B&W and the video test being in color. I attribute this to the LCD being rear-illuminated with monochromatic light from the laser (laser diode, 650nm). The color image from the video may have had inconsistent RG&B liquid crystal absorption/transmission ratios of the monochrome laser light . . . while tonight's B&W test just had to variably filter the light through its greyscale image (consistent liquid crystal absorption/transmission). I did have to make several contrast adjustments in order to maintain highlight and shadow detail, and it's a shame that the result of this could not be captured in the above image. I feel confident that this is in the ballpark. When it comes to high-definition output, I have read several horror stories of dot-crawl and other artifacts when output is sent to an LCD panel, but the 9650 and 846 sync'd immediately and provided a razor sharp, rock-solid image. I picked up the 846 LCD panel for $170 (buy it now price) on Ebay, but have not been able to find another for less than $999 (buy it now price) as of 2/17/04. So, once again, luck seems to be in the stars (so far). If you would like to see a short, 20 second movie of the image while the camera pans, you can Click Here to watch. (RealPlayer Format) The contrast adjustment did cut back the transmitted laser light intensity quite a bit. However, this was a full-frame image -- similar to the size that would be used for an 8 x 10, not a 4 x 5. Even though the contrast adjustment will also cut back the transmitted laser light for the 4 x 5 as well, the light will be less spread out (compared to 640 x 480), so exposure times after beam ratio adjustment (ref/obj) will still be longer than without this adjustment -- but not to the extreme that this larger full-frame image would require. This may also be corrected through making a few polarization tests/adjustments, which I did not carry out last night, but will before making the first shot. I found from the first test that a considerable increase in laser light transmission is obtained when the laser diode housing is rotated (of course). This then has to be matched to the orientation of the reference beam to the glass surface of the holographic master plate (or vise versa). Since the master plate must maintain its orientation, it would be up to the LCD panel itself to be placed either upright, or on its side for mastering (with the associated image(s) being rotated accordingly in an image editing program before being sent to the panel). The size of this LCD panel may require me to raise my optics substantially, compared to their previous table-surface level for a 4 x 5 portrait. The tops of all of my optics posts are threaded, so I'll be heading over to Home Depot to get extensions for added height. I would like to keep the image(s) centered in the LCD panel window -- but I will also look into whether this makes any difference. I would think not . . . just lower the images in the panel display window for 4 x 5's. We'll see which way this goes. I am hoping to do the first, single-frame direct-reflection hologram sometime over the weekend. As usual, it will be with this image. I always try not to add any variables when doing experimentation, so you'll see this image during most of the early work. I know it well, it is right on the money in all aspects, and was originally shot with a medium-format camera with a Carl Zeiss lens. I'm still holding off on making any substantial digital camera purchase until more of this pans out -- knowing that the camera and lens will have to be of utmost quality to match film-based work. During my early days I was fortunate enough to have the opportunity to work with several portraits of the late Francesco Scavullo -- and his portrait of Clint Eastwood that appeared in Men's Heath Magazine in the mid-90's was my digital editing and color separation of his work. So I've had a chance to see what the highest quality in portraiture, both technically and creatively, was like -- by holding examples of it in my own hands (and viewing with my own eyes) and working with it intimately. I guess that's why I'm so hard on digital photography at times -- because the finest digital images do not yet match the finest film-based images. Trouble is, most people never have the opportunity to actually see an exceptional quality, medium-format film-based trannie to make the comparison . . . nor the wet-mount drum scanning, lighting environment, video card, and monitor calibration used in digital image manipulation of said images. The next update will be posted here when I have the opportunity to do a test shot, which will probably take place over the weekend. This will be a one-off, single exposure (no dimension), direct to reflection hologram on a 4 x 5 glass plate. If all goes well, then the next step will be to set up a 8-slit master test, and do a transfer copy. I have also pondered a few ideas concerning one-step methods -- going directly from the digital photography to the finished reflection hologram, eliminating the mastering altogether. At this point in time I do not believe that the LCD panel would be of any use for animating the slits and sync'ing to the images -- due to the "haziness" that I perceive in any 100% clear areas. This would not work due to the fact that the master plate would have to "look" through the panel window. I will look into this for absolute confirmation, one way or the other, when the time comes. Removing the Raw LCD Panel for Use
|