
PODCAST: Preserving the Holy Word of God in Space: Part One
Lecture Count (total):
You may also: Download the MP3 File (16 MB / 16 minutes)
More Podcasts, photos and resources: CLICK HERE
First, a few resources for you...
 Free Student Study Guide
Downloads: Lasers, Holography and Photonics Primer: Here is a great PDF student study guide that you can read and / or download to help with your understanding of lasers, optics, and holography. It also contains history and bios of some of the early researchers in the field. You may use it for homework assignments. Please give credit to holoworld.
 Holograms, Light and the Word of God
Downloads: Holograms, Light and the Word of God: Energy and power are contained in the light spoken into existence by Jesus Christ on Day One of Creation. He is the awesome and powerful Creator of the universe. This paper / lesson shows the connection between holograms, light, and the Word of God.
How To Make A Hologram
Publishing Notes:Updated 5 APR 2018
by Frank DeFreitas
This tutorial is for the person who wants to know the basics about how simple holograms are made. Especially with DIY equipment. You have my permission to print and use this page. Please give credit to holoworld.com.
In this tutorial, we will be following the steps needed to make a "white light reflection hologram". This type of hologram can be matted and framed, lit with a light bulb or sun light, and exhibited on a wall, shelf, or desk.
This will be a "split-beam" hologram, and would be considered a *step up* from the very basic "single beam" holograms found on many other web pages.
Note that each step has a photo associated with it. I have tried to keep the photos small in data transmission size for those with hand-held devices. They should be large enough for those on laptops or home computers. All photos are highly compressed to load quickly, and de-saturated to help conserve ink (and cost), should you decide to print.
Why am I using a skull? These photos were taken many years ago when I was preparing for a project from the University of Pennsylvania Museum of Archaeology and Anthropology in Philadelphia, PA. The skull shown in these photos was a casting which I used for the test holograms. It was the last time that my holography table top was not cluttered with several projects and associated equipment.>
Let's begin . . .

The basic table set-up with laser.
Step One
Here (above) we have our basic set-up to make a hologram. This is known as a sand-table, and can be quickly, easily and affordably assembled in any basement, garage, or school. Although you can certainly make single-beam holograms on smaller systems and even table tops (such as Shoebox Holography), it is usually recommended to have a table system like this for split-beam work. This table measures 4 x 8 feet in size. You could also make a table that is 4 x 4, or even 2 x 4 in size, depending on the size of your final hologram, and how much space (length or throw) would be needed to spread out the laser light (more info later on this).
It is filled with sand to help eliminate vibrations traveling up to its surface. It also floats on lightly-inflated car tire inner tubes. When you make a hologram, vibration and noise must be eliminated as much as possible, or else the holographic image will not be bright (at best), or not recorded at all (at worst). In this lesson, we will be making a hologram of a model of a human skull, which will be used in a museum of anthropology exhibit.
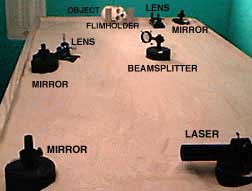
Identifying the components.
Step Two
In the above photo, we are now identifying the equipment that is being used to make the hologram. Take notice of the laser in the lower right-hand corner of the photo. It is a standard, and very common, Helium-Neon laser. High power lasers are not needed to make simple holograms. Therefore, it can be very safe to make them at home or at school. Diode lasers can also be used to make holograms, and I have an entire sectiondevoted to the very first experiments used to achieve this.
We also show 'first surface' mirrors that have the silvering on the front, not the back (for directing the laser beam around the table); the beamsplitter (for splitting the laser beam into two distinct beams); negative focal length lenses (for expanding the narrow laser beam, try a -12 or so); a plate holder (for holding our light-sensitive silver gelatin holographic glass plate, not yet loaded); and our object (the model of the skull).
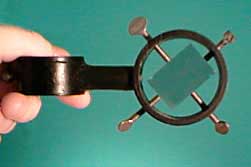
Make your own equipment: DIY.
Step Three
All of the optical components in this photo are made by hand, or what we refer to today as DIY (do it yourself). They are made from PVC plumbing pipe, which can be found at any home improvement center. The gravity bases, which can also be used on a flat surface, are made from coffee cans filled with cement and galvanized steel plumbing pipe. It is very easy and inexpensive to do this, especially compared to how much it would cost to buy this equipment from a scientific supply house. The photo above shows me holding the beam splitting assembly. The piece of glass that is being held in place by the thumb screws is the actual beam splitter. This assembly was made by hand in the year 1983, and it is still being used today in 2014.
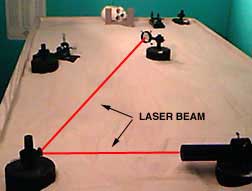
Introducing the Laser Beam.
Step Four
The above photo shows our simulated laser beam leaving the laser and being reflected off of the first transfer mirror. The mirror takes the beam and sends it down the holography table toward the beam splitter. With most home and classroom lasers, you would not see the laser beam unless the room was totally dark and someone introduced some fog to the air. That is because the lasers used for education are very low-power. As mentioned above, you do not need a high power laser to make holograms at home or school. At the same time, laser safety must be practiced at all times. If you enter the terms laser safety into a search engine, you should read how to properly work with any laser, including laser pointers.
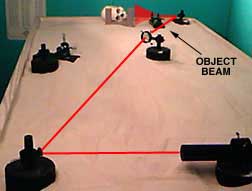
One beam becomes the Object Beam.
Step Five
As you can see, the beam passes *through* the beam splitter, and continues on to the second transfer mirror at the other end of the table. This mirror then directs the laser beam toward the object being recorded. This is called the object beam. Since the diameter of the beam is so narrow (about 1mm), it must be expanded in order to cover the entire object with laser light (so that the object can reflect the laser light toward the light sensitive holographic plate, not yet loaded). To expand / spread / diverge the beam, we must introduce a lens into the system, and pass the beam through it (usually a lens with a negative focal length works well). The resulting diverging light travels to the object and illuminates it for recording. We do *not* want any of this light to strike the plate directly. Only the object. So if you find that the laser light is striking the plate area, block the stray light with a card (or similar baffle).
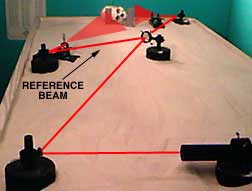
The other beam becomes the Reference Beam.
Step Six
The very same beam that passed *through* the beam splitter is also *reflected* by the beam splitter (and hence the name: beam splitter). This beam which is being reflected is called the reference beam. The beam splitter directs this beam to yet another transfer mirror, and this time the mirror directs the light toward the film holder. However, just like the object beam, the reference beam is just a narrow beam of light, so we will have to expand this beam just like we did with the object beam. Once again, we pass it through a lens which will take the narrow diameter laser beam and diverge the light. We want to spread the light out enough to cover the entire area of the light sensitive holographic plate that will be using (note that the light-sensitive plate is not yet in the plate holder).

A close-up of the split beam set-up.
Step Seven
Here is a close-up of the recording geometry. At this step, we will take distance measurements of both the reference beam and the object beam. Both beams must measure the same distance in order for the laser light to remain in phase for recording constructive and destructive interference within the light sensitive emulsion of the recording plate. Due to their long coherence length, equal distance is of less importance for most of the new diode lasers. It is of more importance when working with a HeNe laser.
For the object beam distance, we will measure from the beam splitter to the object mirror, then from the object mirror to the object, then from the object to the plate holder.
For the reference beam distance, we will measure from the beam splitter to the reference mirror, then from the reference mirror to the plate holder.
Both measurements must equal the same distance, or be as close as possible. If we're within an inch (or so), I'd let it go. If we're more than a few inches off, the set-up will have to be adjusted. Usually this can be done by moving the beam splitter either forward or backward, which will increase or decrease distances accordingly.
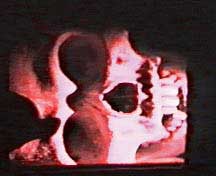
The object illuminated with laser light.
Step Eight
Once our table is set up with optical components, and we see that the object itself is illuminated properly, we are ready to prepare for our exposure. Since we will be processing our exposed plate, it is now time to set-up our processing area. For a white-light reflection hologram, we will usually do development, rinse, a photo bleach, rinse, and final rinse with a few drops of photo flo. Most processing chemistry kits come with instructions for mixing and processing, so I will not duplicate those here.
A more modern option is using photopolymer recording materials. These make holograms in real-time, and do not need any chemical processing at all. Just expose the plate with the laser light, and the hologram is done. They are truly the modern marvels of holography for the home and school enthusiast / experimenter.
One of our final steps will be to turn off all the lights, then take a reading of the laser light intensity, so that we can determine our proper exposure time. We would know this by the light sensitivity of the recording media, which varies from one company to another, and also from product to product within a company. It would be beyond the scope of this single-page primer to go in to determining exposure energy. There are usually suggestions for exposure times in most books and kits, so follow the instructions included with your materials. When in doubt try a 15 second, 30 second and 60 second exposure. At the very least, you should see some type of result at one of these exposure times.
Once we know how long to make our exposure, the laser beam must be blocked with a shutter (usually a piece of black cardboard will work). The room is now in total darkness, although some hobbyist holographers work with a bit of safe light throughout the area (personally, I do not).
The holographer will then take an unexposed light-sensitive glass plate from its box, and place it into the plate holder (remember, the plate has not been out of the box this entire time until now in total darkness). Care must be taken to not disturb any of the components when working in the total darkness. Once the plate is in place, we will wait for several minutes to make certain that everything is quiet. This is called "settling time". To make the exposure, we will lift the cardboard shutter, and expose the plate for the pre-determined amount of time.
When the exposure is made, the laser light that is being reflected from the object combines with the laser light coming in from the reference beam. When a light sensitive emulsion is placed within these two wavefronts, it records their interaction. Since laser light is coherent light, it creates both constructive and destructive interference. The silver grains within the emulsion record this interaction throughout the surface of the plate.
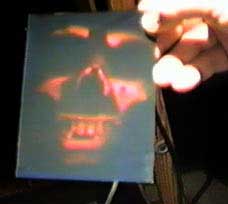
The finished hologram.
Step Nine
Once the holographic plate has been exposed, it must be developed if it is a standard plate. This is very similar to the way we used to develop photographs before digital photography. We use a safelight, and pass the plate from one bath to another. It is very simple to do, and was briefly explained above.
If you were using the photopolymer materials, the hologram was 'processing' during the actual exposure. Once you end the exposure, your hologram is ready.
Regardless of the materials used, when the hologram process has been completed, a three-dimensional holographic image appears before our eyes when we shine a light bulb on it (at the same angle that it was recorded at). It forms, and is visible, due to the interference pattern that is recorded by the laser light. This interference pattern modulates the incoming light back into the original wavefront that was reflected off of the object, so we see the object once again as if it is really there. That is, providing that we did everything correctly!


